Showing posts with label Organize your Space. Show all posts

Sunday, March 24, 2019

Step 6. Arrange Your Space and Evaluate


The final step is the evaluation.  Look at your vision and goals.  Is this what you had in mind when you worked on step 1?  If so great.  If not, what doesn't work?  What can you do to remedy it?  Do you need to go back to the beginning of the process to fix what you don't like or is a simple tweak in order?  This process can be used for organizing your fabric stash, a set of drawers in your sewing room, or a complete remodel.  

In my case, I have a basket full of things that didn't fit the plan.  I will go through these items and see if I can make them fit within my new organization plan.  If not, I will need to make a decision about what to do with them.  


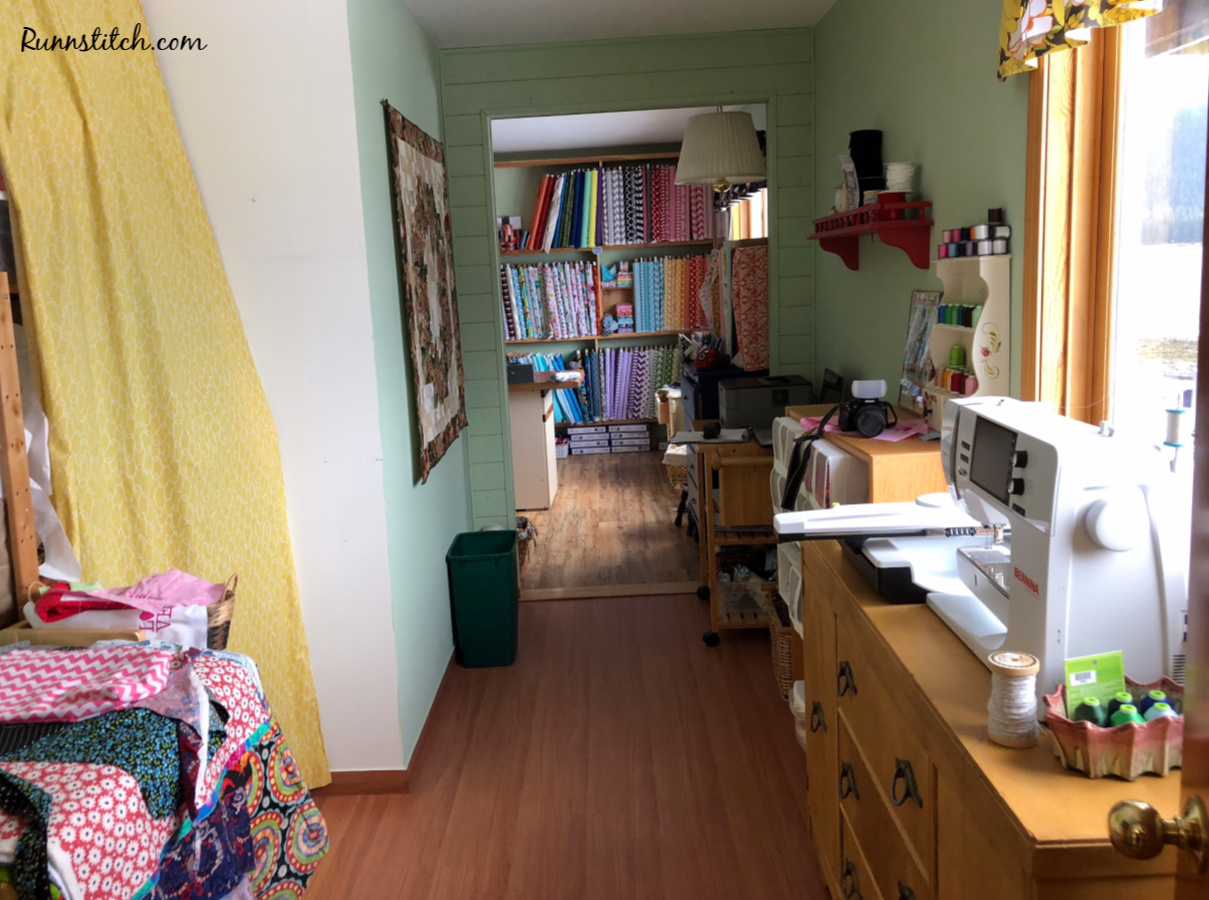
I love sitting in my new space knowing it is clean and organized.  I'd love to hear about your experience with this ongoing task.


Find All Of The Posts I My 6 Step Process HERE

Saturday, March 23, 2019

Step 5: Decision Time

This is where the rubber hits the road.  It’s time to look at what you have identified in the first 4 steps and bring them together to create the craft space you want.  In step 1 you had an idea about what you wanted your space to look like and you set goals. Take a look at your vision and your goals.  Take a look at your inventory and your space for items you want to have available at all times and items you want to store in an easily accessible space.  Then, get to work and make it happen.


As I mentioned earlier, I don't want to do an entire sewing room makeover.  My goal is to have everything for each activity in the appropriate space.  I only want shop related things in my shop.  I want my sewing room to double as a class space and a personal sewing space.  The room in between the shop and my sewing room has been a catch-all but I want it to be well organized and support my work on my embroidery machine and my personal quilting and sewing activities.

Here are the results of my work. In the sewing room, I have organized the tables, machines, tables and drawers.  


The ironing board table had room for storage.
I used this storage area for my class supplies.  The sewing machines, lesson plans.  The supplies fit and are easy to retrieve. The fold away table fits right under the curtain and I can easily get to it to use for classes or anything else I need a table for.  


There was also a little slice of space under the ironing table where all of my Accuquilt Go accessories can hide.


My baskets hold items I need to get to all of the time.  This one has scissors, extra rotary cutter blades, tape measures, my cards and paper.  This basket is in the middle of my sewing room for easy access.  The other basket is located on top of the drawer units and holds my rulers, and tape.


The 'middle' room had the most organization because it is the space to do embroidery projects, store my apron supplies, my UFOs and keep my fabric stash.


The drawer below the machine holds the hoops and stabilizers.


My UFO's are on this shelf and the apron patterns I use are and machine embroidery thread sit on top.

The barristers hold my magazines and books, minky and flannel, my white-on-white fabric and apron fabric. The mannequin for my photographs stands in a corner.  

This storage unit has my fabric stash.  Since I have my own fabric shop, I don't need a very large stash.  I have batiks in the three drawers in the bottom chest and fabrics arranged by color on the rest of the shelf.  

My shop was pretty organized, however, both of the cupboards under my cutting table were crammed full of miscellaneous items, most of which didn't belong in the shop. 

I cleaned the cupboards out and put things in them that belonged.  This cupboard holds all of the items I need for shipping and sales.  It's easy to see what's in here so if any inventory gets low, I can order before the item is gone.  The cupboard on the other side holds my excess inventory.

The printer, computer, printing labels and shipping envelopes are kept on this rolling cart, which is also located in the middle room, right next to the shop.  I also put a tub of Christmas fabric on the bottom shelf which I will pull out when it gets closer to Christmas.


Doing your groundwork before starting a project, sure makes things turn out great.  I am very happy with my organization.  I hope this series was informational and useful.

Find All Of The Posts I My 6 Step Process HERE


Linking To:  Inspiration Monday


Friday, March 22, 2019

Step 4. Identify Storage Spaces


Now that all of your available items are set up in their spaces, it's time to tackle your storage.  I think this is really important.  This is where things can get lost for years.  This is where we can throw this or that just to get it out of the way and never find it again.  This is what I have in my spaces.  I organized my storage space list by room because I already know that my goal for this activity is to store my supplies in the appropriate spot.  I am not doing an overhaul of my space.  I like the way I have organized my space for sewing and selling fabric.  Use this step to meet your individual goals.

Fabric Shop


Middle Room


 Sewing Room


Just a few examples.  See what I mean about the hidden disaster.


Find All Of The Posts I My 6 Step Process HERE

Thursday, March 21, 2019

Step 3. Things You Don't Want In Storage

Step 3

Decide what items you want out at all times, things you don't want to take out of a storage space every time you want to use them.

Take a look at your inventory table. I started with my hard items.  I want to be able to use my sewing machine, my Q20 and my embroidery machine without having to pull them out of storage.  I also want my ironing table to be available at all times, free of miscellaneous stuff that often gets set on it.  


Next, take a look at your soft inventory.  Are there things in this column that you want available at all times?  This is how I filled out my spreadsheet.  I kept my 6 sections but combined sewing and quilting because they need the same supplies.


I also can't store the fabric I have on display in my shop.  This is out all of the time.


I have three separate spaces that I have already defined for each of my work areas.  They are my shop, my sewing space, and the middle room in between.  Depending upon what your goals are, you may need to also identify spaces for all of your inventory.  You will do this in the final step.

Find All Of The Posts I My 6 Step Process HERE

Wednesday, March 20, 2019

Step 2. Inventory Your Supplies

Step 2. Take an Inventory

Be as specific or as general as you need to be.  You may find that you need to be specific about some items and more general about others, for example a more specific inventory may be red, orange, yellow, blue, green, purple, brown, black etc. 2.5 inch fabric scraps.  A more general item on you list may be simply fabric scraps.  It all depends on your personal preference.  I divided my inventory into hard and soft, with hard meaning tables and large objects and soft being everything else. 

This is an example of my inventory worksheet.


I had to pull things out of nooks and crannies to do my inventory.


Find All Of The Posts I My 6 Step Process HERE


Tuesday, March 19, 2019

Step 1: Make a Decision


Make a decision about what you will be doing in your space.  The 6 things I do in my sewing space are:
  1. Fabric Shop
  2. Teach Sewing Classes-mainly to school age students
  3. Sew Aprons
  4. Piece Quilts
  5. Quilt Quilts
  6. Embroidery
You will also need to make a decision about what you want your space to look like. You may love lots of inspirational items around you, or you may like to have ever changing displays for inspiration.  You may not be as concerned about specific areas for items, just easy access. 

I really like a clean slate with easy to find supplies because frankly, the little gray cells aren’t what they used to be.  I hate spending valuable time searching for that one thing I need to finish my project, only to find it two days later upstairs in the kitchen.  In addition, when I sew fabric flies.  It will be easier to keep my space tidy if there is a place for everything.

The first step is to identify your needs and create your goals. 

For example, these are my goals.

1. I would like to designate a space for each of my activities so my supplies are easy to find. 

2.  I want my class materials stored so they are easy to set up.

3.  I want to have room to create my projects, with easy access to everything I need.

4.  I want my shop to be a bright and fun, well organized place to visit.

These are some of the many things I will need to fix.


In the sewing room


In the shop

In the middle room


This first step is critical.  If you want your space to reflect the creative you, a vision is the best starting point.

Find All Of The Posts I My 6 Step Process HERE


Monday, March 18, 2019

Organization Your Creative Space In 6 Steps

How many times have you spent the entire time you planned to create looking for a necessary item?  How many times have you purchased something to use later and put it somewhere and found it after the inspiration has long passed.  How many times have you purchased the perfect item for your next project and put it somewhere, forgotten about it and when you found it again wondered what it was for?  I have done all of these things and more.  

As I have accumulated interests and skills, these things happen more and more often.  In December I purchased 2 new machines and their accessories.  I wrote about it Here and Here.  In January I was away from home for two months and came back to a bunch of stuff I had shoved here and there and had forgotten about.  I spent the first two weeks in March looking high and low for things I needed to do projects. Things like seam rippers, my good scissors, extra pins, you know, important things. I decided enough was enough.  It’ was time to knuckle down and organize my space.  My goal was to be able to find things and to have a place to put new items as I acquired them AND never have to spend precious time looking for things.

 I developed a plan for organizing my stuff that I’d like to share.  I went back to it often as I worked my way through the organization process.  This plan includes these 6 steps.  I will do a post for each step this week.  I hope this helps.

  1. Make a decision about what activities you will do in your sewing or craft room. 
  2. Take an inventory of what you have.  
  3. Identify what items you want to have available;  the items you need every day, things you don’t want to pull out of storage every time you want to use them.
  4. Identify storage spaces, decide if these are appropriate to your storage needs.  
  5. Make a decision about which items to store in each of the storage areas.
  6. Arrange your space according to the plan you have developed and evaluate your decisions.

This is my space.  Don't let the fact that it looks tidy fool you.  Behind every curtain and closet door and in every drawer is a mini disaster.  

Sewing, quilting and class space.

 Embroidery and storage space.

Shop


Find All Of The Posts I My 6 Step Process HERE