Pages

Monday, April 28, 2014

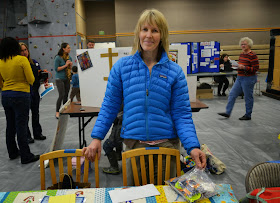
The Health Fair

Every two years, we have a health fair in Petersburg.  This is a time for people in our community to learn about the different healthy lifestyle options provided by individuals, businesses and organizations.  The Petersburg Medical Center offers a low cost blood draw that screens for a variety of things.  There are even add ons for prostate cancer, diabetes and this year, Hep C for an additional cost of only $15.00 each.

The Welcome sign at the Community Gym


Hannah greeted the community with a sign up for door prizes at the entry to the Community Gym.


Linda, Naomi and Linda passed out the results of the blood draw.  


Michelle provided information about the school garden and offered free kale seeds to visitors.


Marlene offered information about breast and testicular cancer screenings and self examinations.


Bridget had a table with information about Child Find.


The Physical Therapists from the Petersburg Medical Center provided information about PT and also had a questionnaire for people to indicate if they would be interested in attending informational classes provided by the PT department.


True North Counseling shared information about the services they provide and they also had great Kombacha samples and recipes for people.


Desi and Carrie provided information about Nuskin.


Angel provided information about health supplements for active people.


 Karen had fitness information and a list of fitness classes she does for Parks and Rec.


We are lucky to have a Parks and Rec department that goes the extra mile to support whatever healthy  activity or sport organizations in town are interested in.  In this case, the woman's roller derby team, the Ragna Rock Rollers and the indoor hockey team, Petersburg Wild Kings.  


Our Fire Department and Emergency Services are provided by volunteers.  Thank you!!!


The Coast Guard Auxiliary is a necessary organization in an island community.


REACH provides services for people with developmental disabilities.  They have provided an infant learning program in Petersburg for years.  Now, in addition, REACH offers more services for people with developmental disabilities.  This table had information about the services it offers in Petersburg.


SEARHC had a table with lots and lots of good information about how to prevent tooth decay.


This table had information about organ donation and offered sign-ups for people who haven't already signed up as organ donors.


DARE is a program that helps 5th grade students understand about the negative effects of drugs.  It is taught in elementary schools throughout Alaska each year.


The SAIL program offers assistive devices for people with disabilities.  When I was a principal in Juneau, we utilized SAIL devices so students with physical disabilities could participate in field trips they wouldn't otherwise be able attend.


Child Care Assistance also had a table to help qualifying families understand and apply for financial assistance for child care services.


These are a few of the informational tables at our Health Fair.  You can see that in a healthy community, like Petersbug, it is important to have opportunities for a wide variety of proactive. healthy living options. It is amazing how many wonderful people provide time and energy to keeping our town healthy and happy.  Many of the people volunteer long hours to provide services to the people of our community.  Thank you!!!

Thursday, April 24, 2014

A Red Table


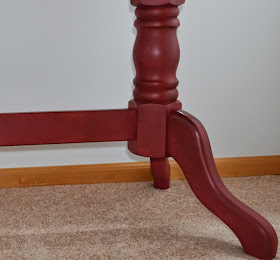
When my husband and I built our home in 1987, we went on a little shopping spree in Seattle and found furniture.  Most of the furniture we bought in 1987 is long gone but this sofa table remains.  It is perfect for holding plants on our landing. 


It is pretty dated and worn though.


This is a job for Annie Sloan Chalk Paint.  I posted my first Annie Sloan project, my Annie Sloan Chalk Paint Kitchen at the beginning of the month.  Truth be told, I painted my kitchen last year.  This year when I went through Centralia, Washington I purchased five more quarts of Annie Sloan paint at Attic Door Vintiques.  I found more blue, yellow, red, lavender, and off white.  I was ready for anything.    

The tools I needed for this project were, Windex and a cloth, paint, a paint stirrer, a plastic container, a paint brush and a plastic measuring cup.  The top of the table was ratty so I needed to sand it a little bit.  I washed the table with a few spritzes of Windex and the cloth.  I gave it a little sanding and the it was ready for painting.


There was a specific red I wanted for this table and the Attic Door stockist told me I would need to mix equal parts Emperor's Silk and Emile.  I used the measuring cup for this.  It was messy!

  
I wasn't sure about this pink, but I soldiered on.


I really wasn't sure about the pinkish color when I finished the table.  It didn't look anything like the color on the dresser I'd fallen in love with at the Attic Door, but, I continued on.  It was nice to have all the junk covered up.  And anything would be an improvement.


The secret was in this little can.  Dark wax made my table look exactly the way I wanted it to.  


Isn't it pretty and shiny!


Didn't the color turn out great!


When the geranium and African violets are in bloom, it will look even more lovely!


Linking Up With:

Monday, April 21, 2014

A Quilt for Audrey


This is the little quilt I made for my granddaughter.   Isn't it cute!


I found this great modern quilt book, Modern Quilts from the Blogging Universe,  by That Patchwork Place, at The Fabric Basket in my hometown, Petersburg, Alaska.  It has  all kinds of fun quilt patterns.


I picked out a pattern by Spotted Stones- isn't it a fun quilt!!


I had some charm squares and a few yards of fabric I found at The Cotton Ball in Morro Bay, California a couple of years ago.  The green is from my local fabric shop, The Fabric Basket.


I put a soft and cozy Moda flannel on the back.  This durable, adorable quilt is perfect for my little Audrey.

Inspire Us Thursdays, Lamberts Lately Create It Thursday, Needle and Thread Thursday, Really Random Thursday, Catch a Glimpse Linky Party, Pencil in a Visit Promotion/Live Laugh Linky #109,


Wednesday, April 16, 2014

A Little Easter Bag


I have finished the little Easter baskets for my granddaughters.  Both girls have a sweet little fabric basket with an Easter banner.  In addition, Audrey's basket has a cute little bib I made with the leftover pieces of banner fabric.  Jill's now has a little Easter bag that I made with the leftover pieces of her banner fabric.


First I made a little sheet of fabric.  For more information about how to do this CLICK HERE.


 I used a pattern from The New Handmade by Cassie Barden to make this little bag.  Please note...I respect the the copyright and am only noting things I did to change the published pattern.  You will need to purchase this book to complete this specific pattern.  You can purchase this book at the link above.

I decided to do a little quilted bag so rather than putting the interfacing on the lining as directed in the pattern, I did the following:

1.  Cut the fabric as directed in the pattern.


 2. Cut the lining pieces.  This was leftover from the fabric basket I made.


 3.  Make a fabric 'sandwich' with the top, batting and backing.


4.  Find a fun thread.


 5.  I attached my BSR.  The fabric had bubbles so I decided to do a quick little bubbly pattern.


 6.  Trim the pieces.

7.  Cut the zipper down to size.  I get zippers at garage sales and thrift stores so I rarely have one that's the necessary length in the color I need.  You can cut your zipper down by zig zagging a stop where you want the zipper to stop and then cutting the remaining bit off.  I only do this with plastic zippers.


8.  Pin the zipper right side up to the right side of the lining, matching the edge of the zipper to the raw edge of the lining fabric.  Using your zipper foot,  sew in place.


 9.  Lay the little bag fabric on top of the zipper, right side down. Pin and sew.


10.  Do the same thing to the other side of the zipper.  You can get detailed instructions in the pattern book.  

11.  Add a little bling.  Before sewing the little bag together, I added some beads.  I just sprinkled them around randomly.  I always tie a knot after every 3rd bead-at the back and continue on.  I don't cut after tying.  That way if a bead gets pulled off, all the beads don't come off.


12.  Finish the bag as directed in the pattern. 


Linking to: